Log Home
Repair and Restoration Inspection Checklist
Would you like to restore that old log home that you found on the
property you just bought? Or have you had a chance to "steal" a log
home at a low price because it was in need of repair? Whatever the
reason, log homes are beautiful and, if they have not suffered from
total neglect for too long, you can restore them back to their
original pristine charm and beauty.
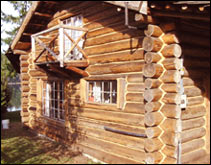
BEFORE 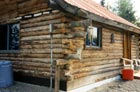 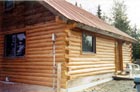 AFTER
AFTER
Log home restoration, although not a real easy job, is very
rewarding as you see the fruits of your efforts when the home is
finished. What do you look for when preparing to start restoration?
First of all, most structural integrity of a log building comes
from the corners. A thorough inspection of the corners to
determine the level of degradation will offer a lot of insight as to
how well the restoration will go.
 Look for Mold and Mildew Look for Mold and Mildew
Minor rotting and the presence of mold or mildew can be dealt with
very effectively, and should not deter you from taking on the project.
Inspect your roof
The next place to look at is the roof structure, collar ties inside
the home and the upper two thirds of the walls. This is especially in
the case of two story homes, or homes with a loft. Look at the plumb
line of the upper sections, compared with the lower wall sections.
Often, especially during the early 1900s, collar ties were cut short.
With the constant weight of the roof pushing down, they lacked the
strength to keep the upper three or four courses of logs from being
pushed out.
You also need to check the roof for "swags" or other indications of
improper settling. 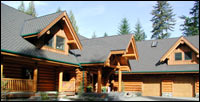 As
older homes settled, quite often the roof was held up by the interior
supporting beams that run from the floor to the roof. In essence, the
walls and most of the roof settled around the supports. As
older homes settled, quite often the roof was held up by the interior
supporting beams that run from the floor to the roof. In essence, the
walls and most of the roof settled around the supports.
In severe cases, it may become necessary to replace the entire roof
structure. And while you have the roof off, you might as well pull the
walls back in line before you start to replace the roof.
Check doors and windows
Another place to check for improper settling is the doors and
windows. If the windows show signs of being out of level, or do not
open and close freely, then you may have to rework the jambs and
replace the doors and windows. 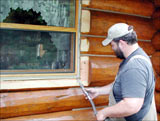 The home has probably settled on the windows or doors, and
over a period of time has made them difficult to use. The home has probably settled on the windows or doors, and
over a period of time has made them difficult to use.
While you're inside the home, pay special attention to any
stains that indicate water infiltration at some point in time. Some of
the places that will be the most evident are support beams that pass
through the log wall to the outside. If not properly sealed, water can
enter the wall easily and possibly lead to rot, decay and insect
infestation.
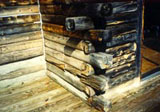
Check inside corners and
fireplaces
Any suspected areas can be probed with an ice pick to determine the
damage. Also, check around fireplaces and mantels. Remember, logs can
move, masonry cannot. So the propensity for more leaks is present in
these areas, once the settling process has finished. Check the inside
corners for drafts or light that may allow for heat or cool to escape.
It is very difficult to get a "perfect" corner cut, especially back
when no one had the proper tools. Consequently, its common in older
homes to have corners that dont fit exactly .
As the tendency always goes, the desire to make the inside look
good often outweighs the real need to start on the exterior. In
reality, you really should think about what you need to do to stop the
weather from doing whatever it has been doing for the past few years.
So, fight that urge to start ripping the inside apart, and concentrate
on the exterior first, especially if the weather permits.
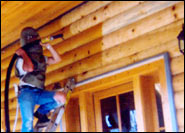
Clean the exterior
If the home has gone several years without any care, probably the
best thing to do first is a good exterior cleaning to remove all the
graying, mold, and mildew to see what the wood underneath looks like.
Quite often, once all that old buildup is removed, the wood comes
out looking very good. 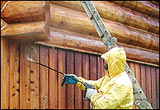 But, before you start the cleaning process, take note of any suspected
areas of rot, or excessive moisture retention before you just blast
away at the home.
But, before you start the cleaning process, take note of any suspected
areas of rot, or excessive moisture retention before you just blast
away at the home.
To effectively clean the old stuff off, secure a pressure washer,
household bleach, TSP, or some of the new percarbonate cleaners
offered in the market. You may also want to think about picking up
some Oxalic Acid to "brighten" the wood up and neutralize the surface,
especially if you decide to use bleach or stripper.
Pressure washers
The pressure washer you get should be around 1500 pounds per square
inch (psi). Remember, this is an older home and you dont need 4,000
(psi) to remove the old finish and whatever else may be growing on the
wood. You just need enough pressure and water volume to effectively
remove the stuff you want. Higher pressures will most certainly damage
the wood and will blow water inside.
Using bleach
Using bleach is harsh on wood and we use bleach only as a last resort. We use CPR, TimberWash or TimberBrite whenever we can. When you are ready to use the bleach mixture, put it in a low
pressure (garden type) sprayer and start applying the mixture at the
bottom of the structure first. Bleach applied to the top will run down
the wall and cause streaks that can only be removed by sanding. Use
bleach solution no stronger than 3 parts water to 1 part bleach. Leave
the bleach on for 10-30 minutes and then rinse thoroughly to remove
the residue. Some areas may require additional bleaching or cleaning
to entirely remove discolorations. When rinsing with a pressure washer
take care not to excessively damage the wood.
Always be careful when using bleach or bleaching agents, as they
are normally caustic and can cause severe burns to the skin and eyes.
Wear the appropriate safety gear, glasses, gloves and long sleeves,
and anything else that will keep the bleach off your skin.
Pressure washing normally will "fuzz" the wood somewhat, and if you
stay in one place too long, you will most certainly damage the wood.
If this happens, a light sanding once the wood is dry can remove the
fuzz. The pressure washer will also find all of the leaky spots in the
corners and other places, so its a good idea to have someone inside
to monitor the amount of water coming in.
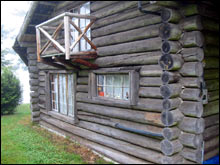 
Before and After
Corn grit blasters
If the idea of using caustic compounds and high pressure water
bothers you, consider the use of a system to "dry clean" your home
that involves no water, no caustic products and once clean, is ready
for the application of a finish. There is also no harmful residue to
deal with since the blast media is biodegradable and will rot and go
into the soil. The home will be dry and whatever media gets inside can
be easily cleaned up with a vacuum cleaner.
The downside is that most homeowners do not have a Blaster sitting
at their local rental mart, and they have to obtain it from another
source. These blasters also require a healthy amount of air to
effectively move the blast media. In addition to the blaster you will
need an air compressor capable of putting out between 125 and 185
cubic feet per minute (CFM) at 90 pounds per square inch(psi). By
comparison, the normal shop type air compressor only produces about
8-10 CFM at 90 psi.
 To blast with corn, you dont need excessive
pressure; you do need a high volume of air. If you think youre ready
to do this, again, be prepared for the job. Proper safety equipment,
right tools, and some extra help will make the job easier and more
efficient. To blast with corn, you dont need excessive
pressure; you do need a high volume of air. If you think youre ready
to do this, again, be prepared for the job. Proper safety equipment,
right tools, and some extra help will make the job easier and more
efficient.
When preparing to blast your logs, be sure to follow all of the
directions that came with the equipment, especially the safety end of
the operation. Make sure the equipment is hooked up correctly, and you
understand all of the safety requirements. Start the cleaning process
at the back of the house, or on some other unnoticeable wood surface
to see how the corn grits clean and what type of surface will be left
before you just blast away on the front wall of the home. Start by
holding the blast nozzle 2-3 ft. away at a 45 degree angle.
Once you get started, move in or out as need be to get the best
cleaning action. Not all logs will clean the same, especially with
old, weathered logs.
If you pass over an area that seems to leave some of the spots,
move on. Dwelling or staying in one area too long will cause
unnecessary damage to the wood.
The blasted surface will have varying degrees of texture, based on
log density, operator capability, and other factors. The corn media
will remove the soft wood easier than it does the hard wood, so
normally the wood will have a "weathered" look. This look also cause
the subsequent stain to develop a deeper color due to the texture of
the surface and the inability to reflect light as a smooth surface
does.
Make sure to test a small area or sample wood with the finish you
are planning to use prior to staining the entire structure. Another
way to lessen the darkening effect is to borrow a trick from the
furniture industry.
First apply a clear coat of finish that will allow you to put a
color coat on as a second coat. The first coat must not have water
repellents or waxes.
RETURN TO TOP
BACK TO RESTORATION TABLE OF CONTENTS
|